Now, I can hear you asking, "How do I get started with coding these widgets?" Well, there’s a treasure trove of resources for that! Check out Flutter’s official docs for the basics, and this amazing GitHub repo for a curated list of Flutter libraries, tools, tutorials, and more. For more hands-on learning, take a look at these practical examples.
Here is a diagram showing the widget life cycle in Flutter.
Before you go deep into this blog, I’d also recommend checking out this GitHub project (it's Flutter’s source code!), and this awesome list of Flutter samples. Also, don't forget to join the Flutter Community on GitHub for insights and discussions. Oh, and this list of Flutter apps that are absolutely rocking it, for some inspiration!
Here’s what you’ll be looking forward to in this blog:
- Understanding Stateful vs. stateless widgets: What They Are and When to Use Them
- Code Deep Dive: Crafting Widgets in Style
- Mixing it Up: Combining Stateless and Stateful Widgets
- Best Practices: How to Optimize Your Widgets for Performance
- Resources to Become a Flutter Ninja
Stateless Widgets Unraveled
What Makes a Widget Stateless?
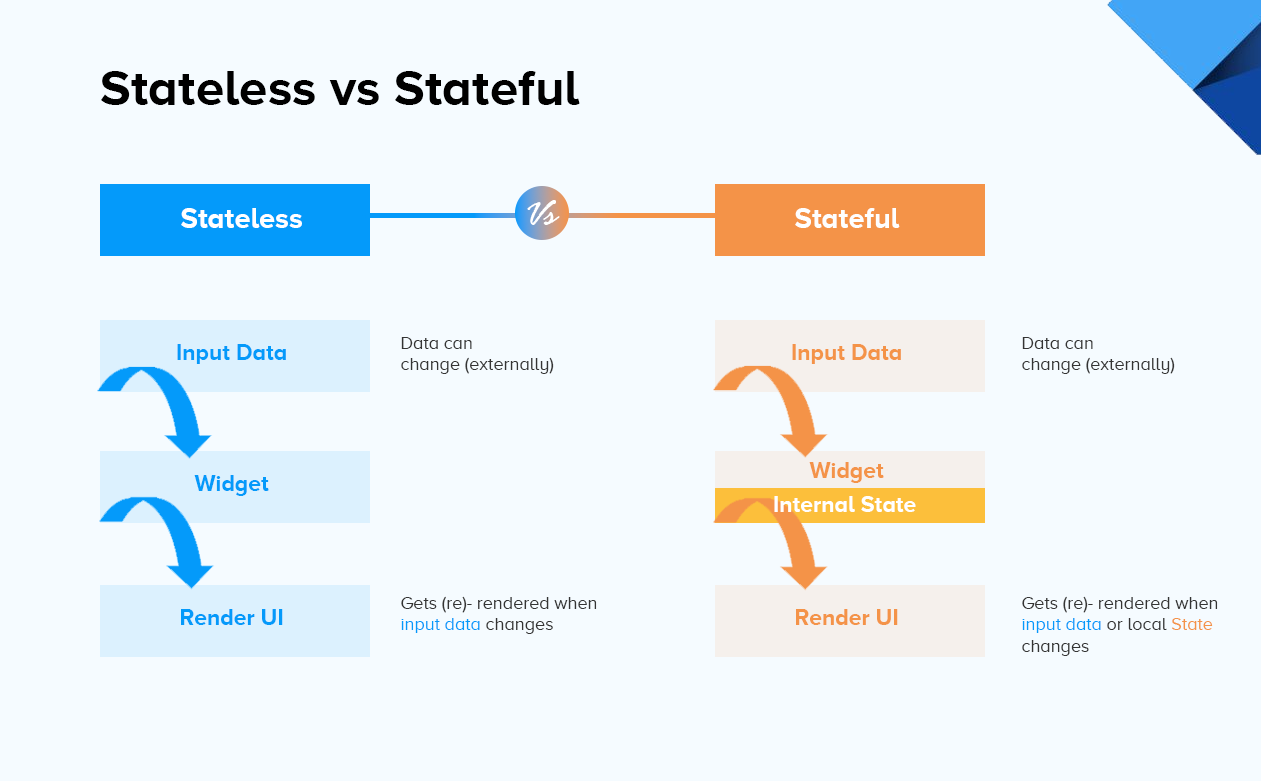
A stateless widget in Flutter is an immutable widget that doesn't have any mutable state. Once a stateless widget is built and rendered on the screen, its properties and appearance remain unchanged throughout its lifetime.
Key Characteristics of Stateless Widgets
- Immutability: Stateless widgets are immutable, meaning they cannot change their state or properties once they are built. This immutability ensures consistency in the appearance and behavior of the widget.
- Static Behavior: Stateless widgets exhibit a static behavior as they don't respond to external events or user interactions. They are perfect for representing static content, such as displaying text, icons, or images that don't require updates based on user actions.
- Efficiency and Performance: Since stateless widgets don't have mutable states, they are highly efficient and lightweight. They don't need to track any changes or trigger rebuilds, resulting in better performance for your Flutter applications.
Dissecting the Code Anatomy
To understand the structure and components of a stateless widget in Flutter, let's break down the code and examine its anatomy. We'll also walk through the process of creating your first stateless widget using code snippets.
Structure of a Stateless Widget
A stateless widget consists of the following components:
- Class Declaration: Begin by declaring a class that extends the StatelessWidget base class. This class will represent your stateless widget and define its behavior and appearance.
- Constructor: Define a constructor to receive any necessary parameters or properties that the widget requires. These parameters will allow you to customize the widget's behavior and appearance.
- Override the build Method: Every stateless widget must override the build method. This method defines the UI of the widget and returns a widget tree that describes how the widget should be rendered.
Creating Your First Stateless Widget
Here's an example of creating a simple stateless widget named MyStatelessWidget that displays text:
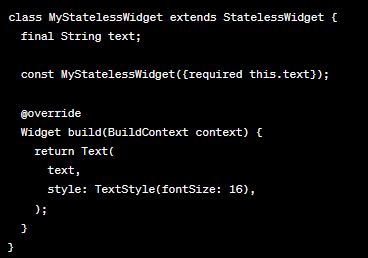
In the code snippet above, we declare the MyStatelessWidget class, which extends StatelessWidget.. It has a constructor that takes a text parameter, used to customize the displayed text.
Inside the build method, we return a Text widget, passing the text parameter and applying a specific style using the TextStyle class.
This stateless widget can now be used throughout your Flutter application by creating an instance of MyStatelessWidget and providing the necessary text.
Components of Stateless Widgets
- Context: The BuildContext parameter passed to the build method provides access to the widget's surrounding context, allowing you to interact with other widgets or retrieve resources.
- Return Type: The build method must return a widget that describes the user interface of the stateless widget. In the example, we return a Text widget, but you can return any other widget or widget tree as needed.
- Properties and Parameters: Stateless widgets can have properties defined in their constructors, allowing you to customize their behavior. These properties can be used within the build method to affect the widget's appearance or functionality.
When it comes to Flutter development, understanding the distinction between stateless and stateful widgets is crucial for building efficient and dynamic user interfaces. By enrolling in an
iOS Certification Course, you can delve deep into Flutter's widget system and gain a comprehensive understanding of how stateless and stateful widgets function.
Stateful Widgets Demystified
Stateful widgets in Flutter are widgets that can change and maintain mutable state during their lifetime. They allow you to handle dynamic behavior, respond to user interactions, and update their appearance based on changes in the state.
Characteristics of Stateful Widgets
- Mutable State: Unlike stateless widgets, stateful widgets have mutable state that can be modified and updated over time. This state can include variables, properties, or data that affects the widget's behavior and appearance.
- Dynamic Behavior: Stateful widgets can change and adapt based on user interactions, external events, or changes in the underlying data. They allow you to create interactive UI elements that respond to user input.
- Rebuilds with State Changes: When the mutable state of a stateful widget changes, it triggers a rebuild of the widget, updating its appearance to reflect the new state.
The Two-Class Structure of Stateful Widgets
Stateful widgets in Flutter consist of two classes: StatefulWidget and State.
- The StatefulWidget class represents the stateful widget itself. It is responsible for creating an instance of the corresponding State class and managing the lifecycle of the stateful widget.
- The State class is where the mutable state resides. It contains the data and logic that can change during the lifetime of the widget. The Stateclass is associated with a specific StatefulWidget and is created when the stateful widget is instantiated.
To understand these concepts clearly you need to have your basics like what Flutter is, its benefits, and main features very clear. Without a deep understanding of the basics you will find it difficult to fully grasp these concepts.
Code Example of a Stateful Widget
Here's an example of a simple stateful widget named MyStatefulWidget that increments a counter when a button is pressed:

In the code snippet above, the MyStatefulWidget class extends StatefulWidget and overrides the createState method to create an instance of the corresponding _MyStatefulWidgetState class.
The _MyStatefulWidgetState class extends State and holds the mutable state of the widget. It includes an _counter variable and an _incrementCounter method that increments the counter when the button is pressed.
The build method of the _MyStatefulWidgetState class defines the widget's user interface, including a Text widget to display the current counter value and a RaisedButton widget to trigger the increment action.
The Role of setState
The setStatemethod is crucial in stateful widgets as it informs Flutter that the mutable state has changed and triggers a rebuild of the widget. By calling setState, you update the state and schedule a rebuild, allowing the widget to reflect the updated state in its appearance.
It's important to note that setState should be used to modify the mutable state within the State class, as direct modifications without setState won't trigger a rebuild.
Understanding the structure, classes, and the role of setState in stateful widgets is essential for creating interactive and dynamic UI elements in your Flutter applications. By utilizing stateful widgets, you can build UI components that respond to user actions and adapt to changes in the application's state.
Stateless vs Stateful – A Side-by-Side Comparison
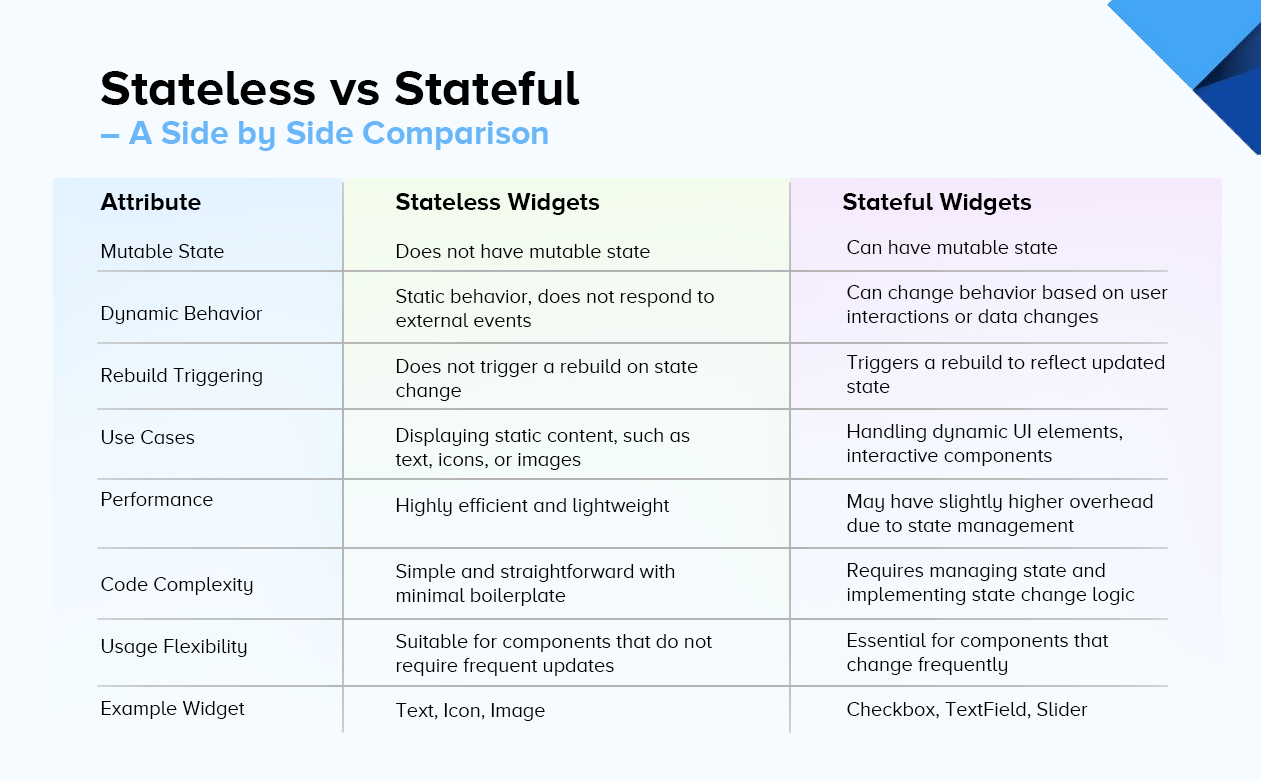
Comparing stateless and stateful widgets side by side is essential for Android developers seeking to create dynamic and responsive user interfaces.
By enrolling in an Android Training Course, you can explore the nuances between stateless and stateful widgets and gain a comprehensive understanding of their implementation in Android app development.
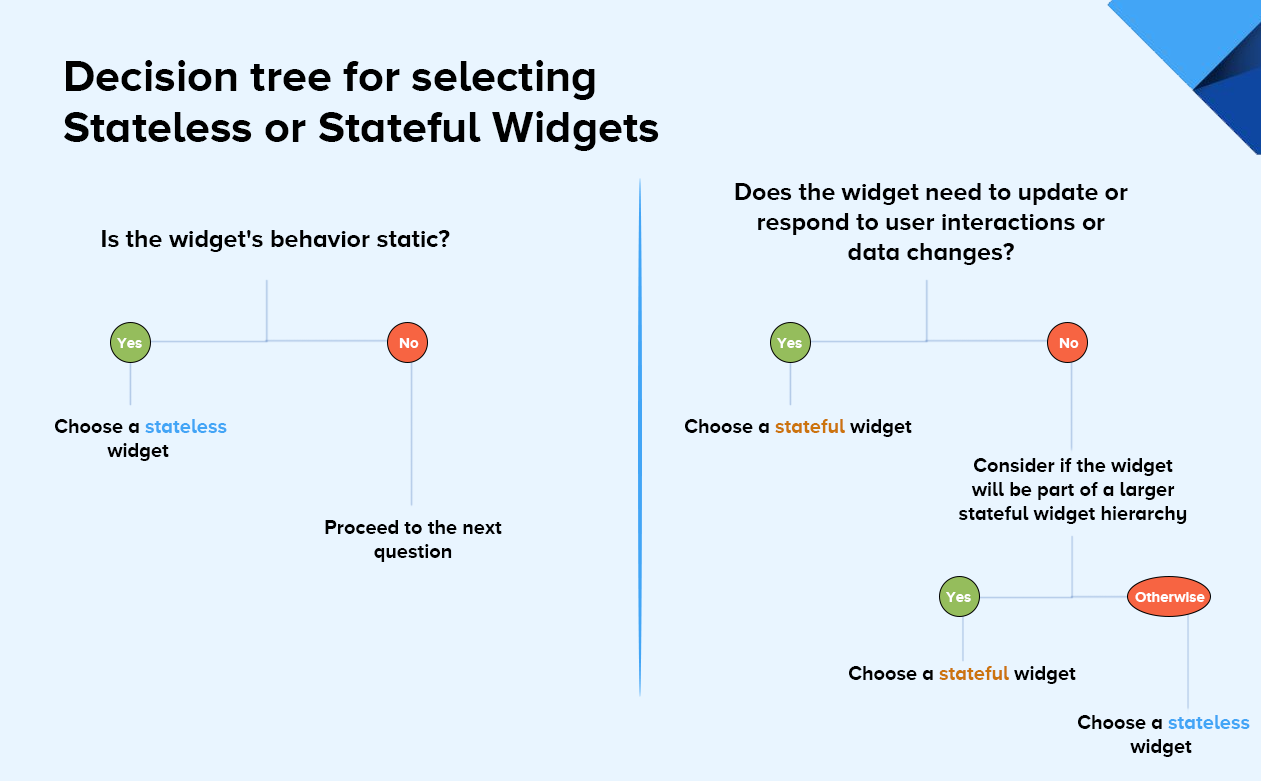
Choosing the Right Widget for Your Application
Advanced Techniques
Combining Stateless and Stateful Widgets
Combining stateless and stateful widgets is a common practice in Flutter development. It allows you to create efficient and interactive user interfaces by leveraging the strengths of both widget types.
Here's how you can efficiently combine stateless and stateful widgets in your Flutter application:
- Identify the Interactive Components: Determine which parts of your UI require dynamic behavior or user interactions.
- Encapsulate Stateless Widgets: Wrap the stateless widgets that form the static parts of your UI around the stateful widgets.
- Pass Data to Stateless Widgets: If your stateful widget needs to communicate with the stateless widgets, pass data or callbacks from the stateful widget to the stateless widget as constructor parameters.
- Update Stateful Widgets as Needed: Implement the necessary logic within the stateful widget to handle state changes, user interactions, or data updates. Use the setState method to trigger a rebuild when the state changes, allowing the stateful widget to update the UI.
Code Example
Here's an example that combines a stateful widget (CounterScreen) with a stateless widget (CounterButton):
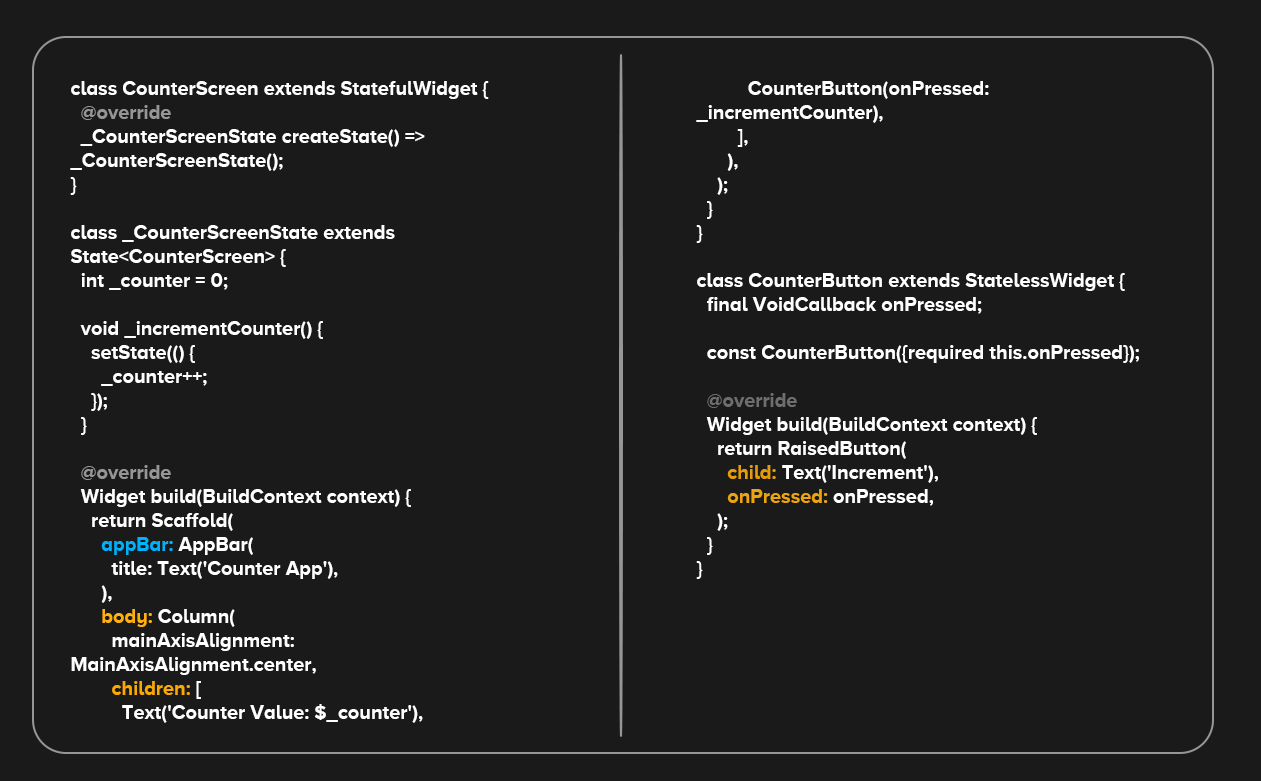
In the above example, the CounterScreen widget is a stateful widget that manages the _counter state. It updates the state when the button is pressed using the _incrementCounter method.
The CounterButton widget is a stateless widget that encapsulates the button. It receives the onPressed callback from the CounterScreen widget as a constructor parameter.
By combining these widgets, the CounterScreen remains stateless while the CounterScreen manages the state and updates the UI accordingly.
By effectively combining stateless and stateful widgets, you can create powerful and interactive UI components in your Flutter application.
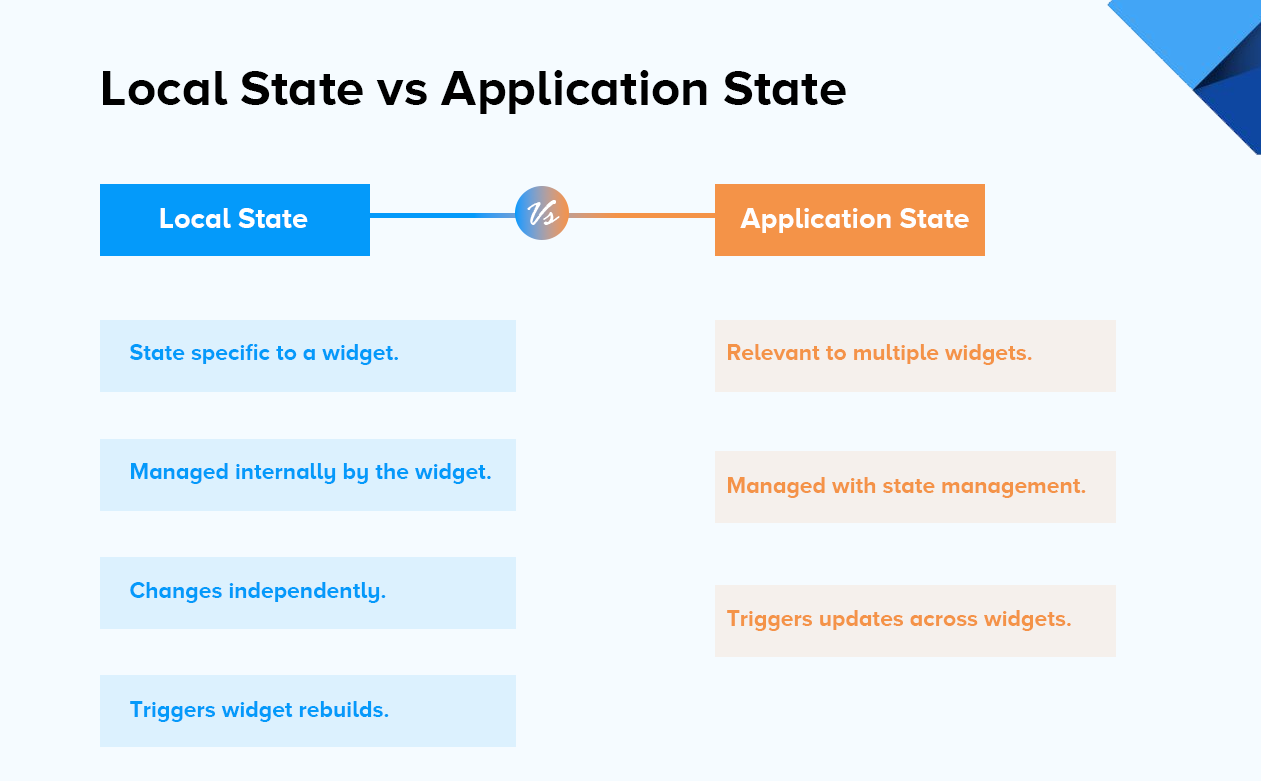
Local State vs Application State
Conclusion
Ready to take your Flutter projects to the next level? Enrolling in a Flutter Course in Ahmedabad will help you learn about widget experimentation and optimization! By exploring different widget combinations and fine-tuning their performance, you can create stunning and high-performing Flutter apps.
To get started, check out these GitHub repositories like Flutter Samples and Awesome Flutter, offering a treasure trove of code snippets, libraries, and resources. Experiment, iterate, and adapt these examples to fit your project's unique requirements.
Looking for a comprehensive learning experience? Enroll in a Flutter Development Course at TOPS Technologies, where expert instructors guide you through the ins and outs of Flutter development. Gain hands-on practice, learn advanced techniques, and master the art of widget optimization.
Embrace the power of widgets and unleash your creativity! Enroll in a Flutter course at TOPS Technologies and craft exceptional Flutter applications.
Frequently Asked Questions (FAQs)
What is the difference between StatelessWidget and StatefulWidget in Flutter?
StatelessWidget is a Flutter widget that represents an immutable UI element. It doesn't have a mutable state and remains unchanged once built. On the other hand, StatefulWidget is a widget that can change and maintain mutable state during its lifetime. It can update its appearance based on changes in the state.
When should I use a StatelessWidget?
You should use StatelessWidget when the UI element you're creating doesn't need to update or respond to user interactions. It is ideal for displaying static content that remains constant throughout its lifetime, such as text, icons, or images.
Enrolling in a Flutter course in Surat will help you learn how to use StatelessWidget and implement them properly!
When should I use a StatefulWidget?
StatefulWidget is the right choice when you need a UI element that can change dynamically based on user interactions or external events. It is suitable for components that require updates, such as counters, form inputs, or animations.
How can I update the state in a StatefulWidget?
To update the state in a StatefulWidget, you use the setState() method. Within the setState() method, you modify the state properties, triggering a rebuild of the widget and its descendants. By calling setState(), you ensure that the updated state reflects in the UI.
Can I mix stateless and stateful widgets in Flutter?
Absolutely! Flutter allows you to combine both stateless and stateful widgets to create complex and interactive UIs. You can use stateful widgets for managing dynamic parts of the UI that require state changes, and surround them with stateless widgets for static content or structural elements.
Enroll in a Flutter course to sharpen your skills and master Stateless and stateful widgets!


